| date | desc |
|---|---|
| 16 Nov 2023 | initial |
| 5 Feb 2024 | added noreply bubble property (3.1) and first cut of TextTalk UI screen (5.0) |
| 19 Feb 2024 | added Appendix FC for FreshChat installation |
TextTalk is a Text-to-Rainbow integration within ICON Signals.
Messages are proxied back and forth between Rainbow bubbles and mobile devices (or website chat widgets).
There are several possible modes of operation, but this document will focus on the characteristics of an implementation that is already in production use. Other options will be discussed but have not been tested.
We will consider communication between a mobile phone user and staff members with Rainbow accounts.
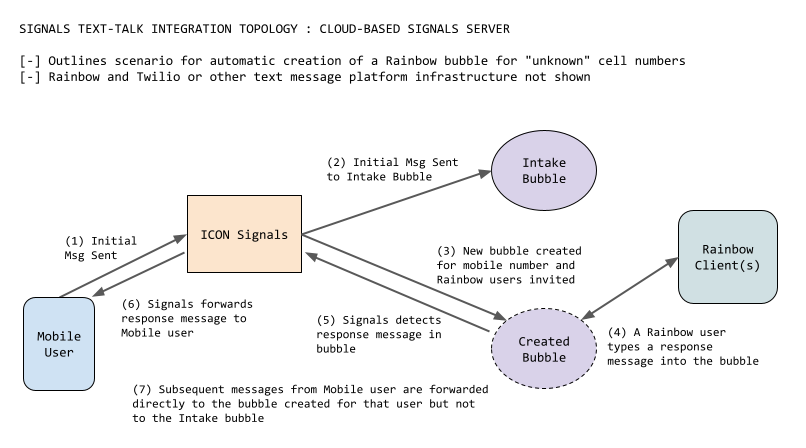
(1) A message from an unknown mobile number is received by Signals.
(2) Signals sends the message to a configured "Intake Bubble"
(3) Signals creates and configures a new bubble and associates it with the mobile number
At the core of the TextTalk application is a mapping between individual cell phone numbers and Rainbow bubbles. These mappings are stored in the Signals integration table. Additional configuration in the integration table includes the details of bubble management.
If there is no mapping for an incoming text message (i.e. an unknown cell number), then Signals does the following:
At the end of this process, a staff member should own the bubble and have the ability to rename it, delete it, or send invitations to additional Rainbow users.
(4) Staff members enter text into the newly created bubble
(5) & (6) Signals detects response messages from bubble users and sends them back to the originating mobile number
(7) Additional messages sent by the mobile user are sent directly to the newly created bubble
The Intake Bubble dates back to early work on the TextTalk integration. It can be configured to support manual instead of automatic creation of bubbles. This option may not be desirable, so it is possible the Intake Bubble will eventually be removed.
In this section we assume ICON Signals is already configured to send and receive Rainbow messages.
TextTalk functionality is enabled by configuring a Rainbow bubble in:
PBX / Alcatel Rainbow > Rainbow Bubbles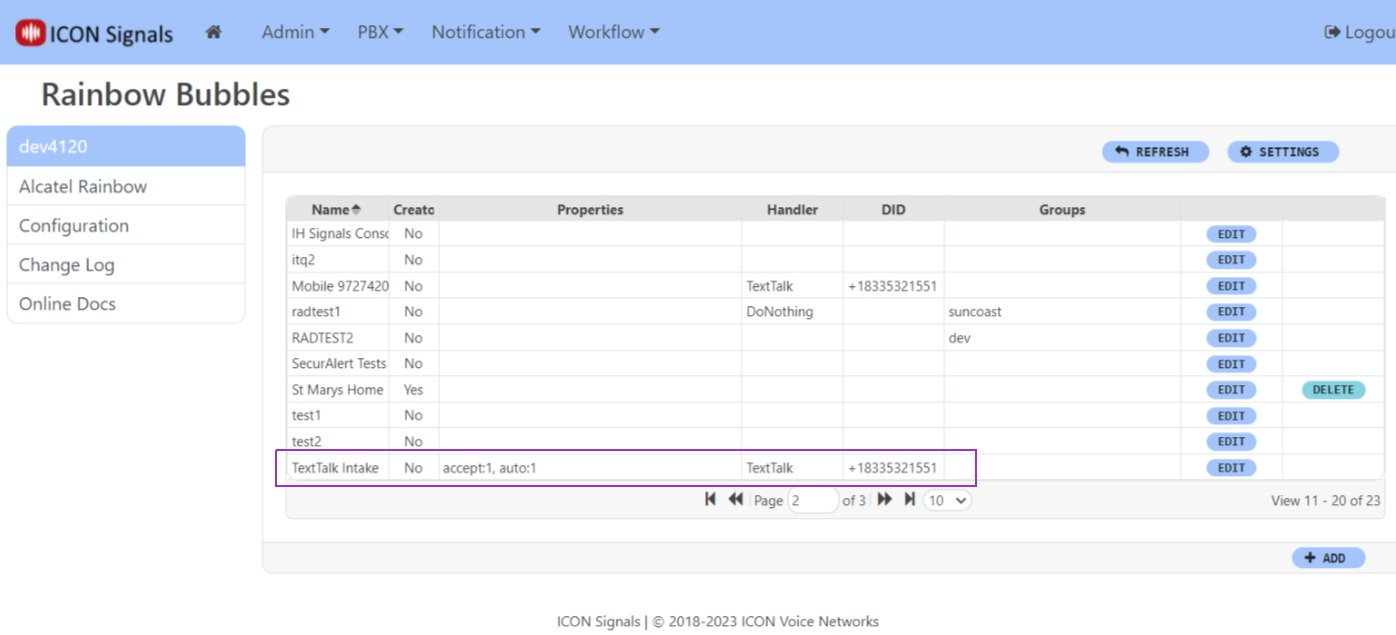
This page shows the Rainbow bubbles in which this ICON Signals server is a member. Note that Signals does not have to be the bubble owner.
(3.1.1) Intake Bubble Properties
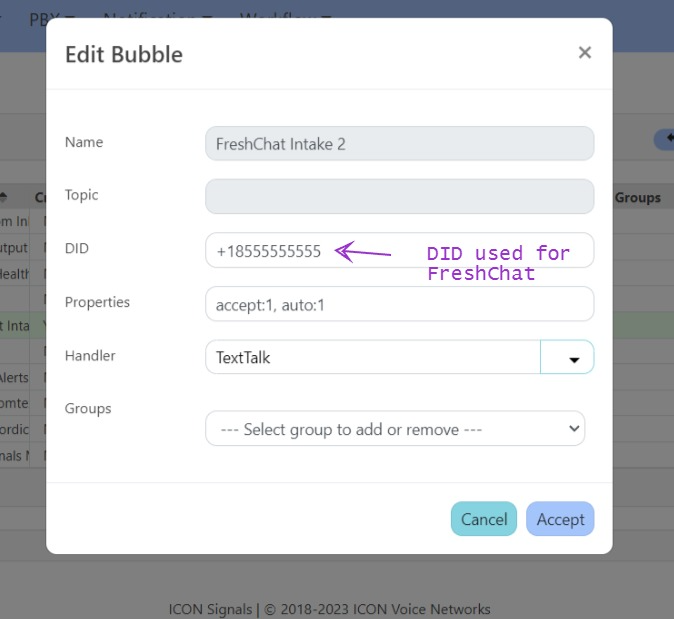
The "intake" bubble configured with the TextTalk handler, an SMS DID, and accept and auto properties as shown below.

An accept value of 1 indicates incoming text messages from "unknown" cell numbers will be handled by this bubble.
An auto value of 1 means a new Rainbow bubble will automatically be created when the first incoming message from the unknown number is received.
In this context, "unknown" simply means Signals has never received a message from the cell number.
(3.1.2) Destination Bubble Properties
Currently we have one destination property for TextTalk bubbles.
noreply value of 1 indicates that messages by other Rainbow members should not be sent back to the originating sender.The noreply property is useful when the sender is a device or system, rather than a human.
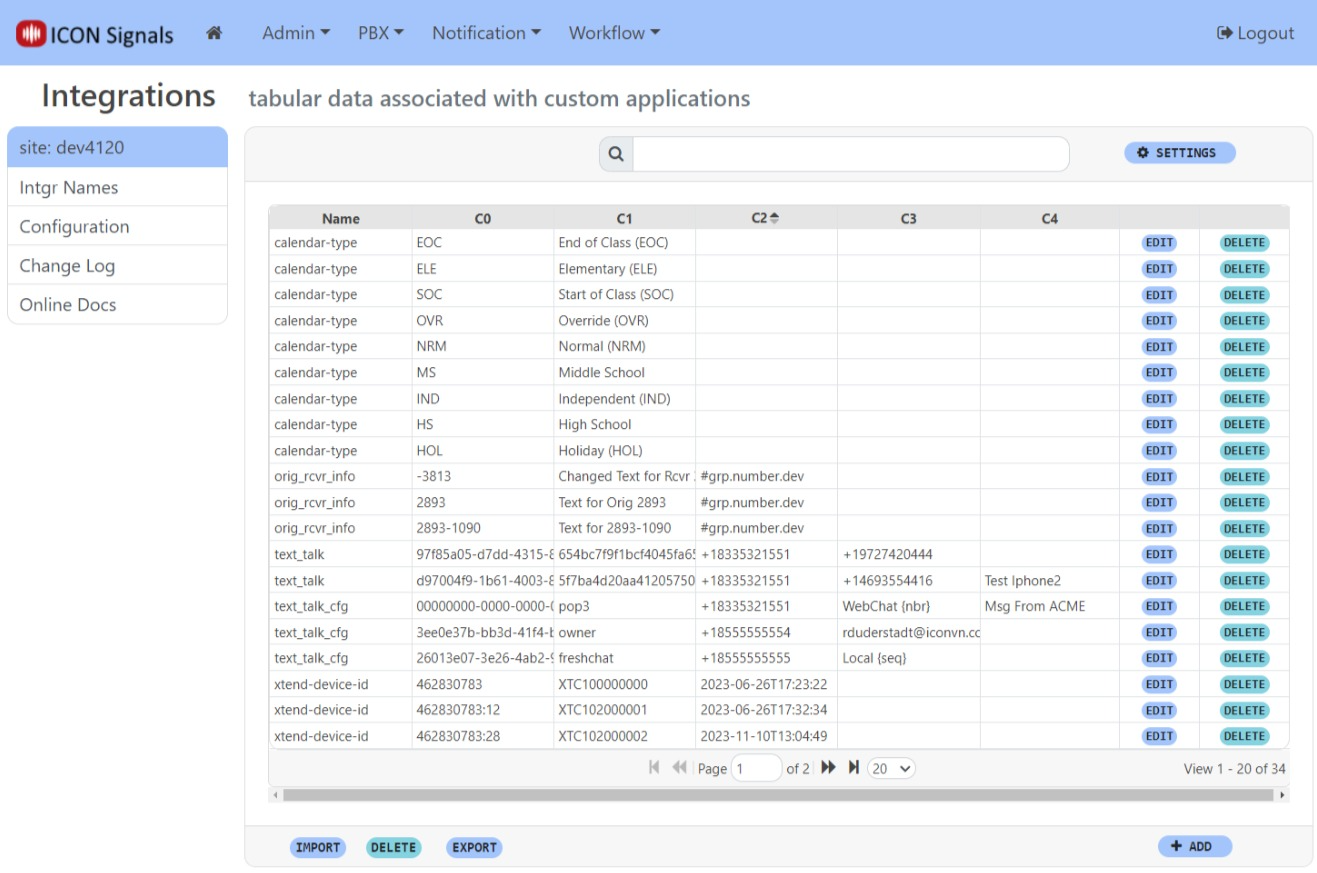
The Integration Table ( Workflow > Integrations ) contains data configured within the Signals UI as well as data added or updated by the Signals server during TextTalk operations.
NOTE:
The Signals UI to modify integration table rows is completely generic. At this time there is no TextTalk-specific interface. However, we may develop one in the future.
The Calendar integration is a good example. It also uses the integration table, but has a much more user-friendly interface tailored to the Calendar application.
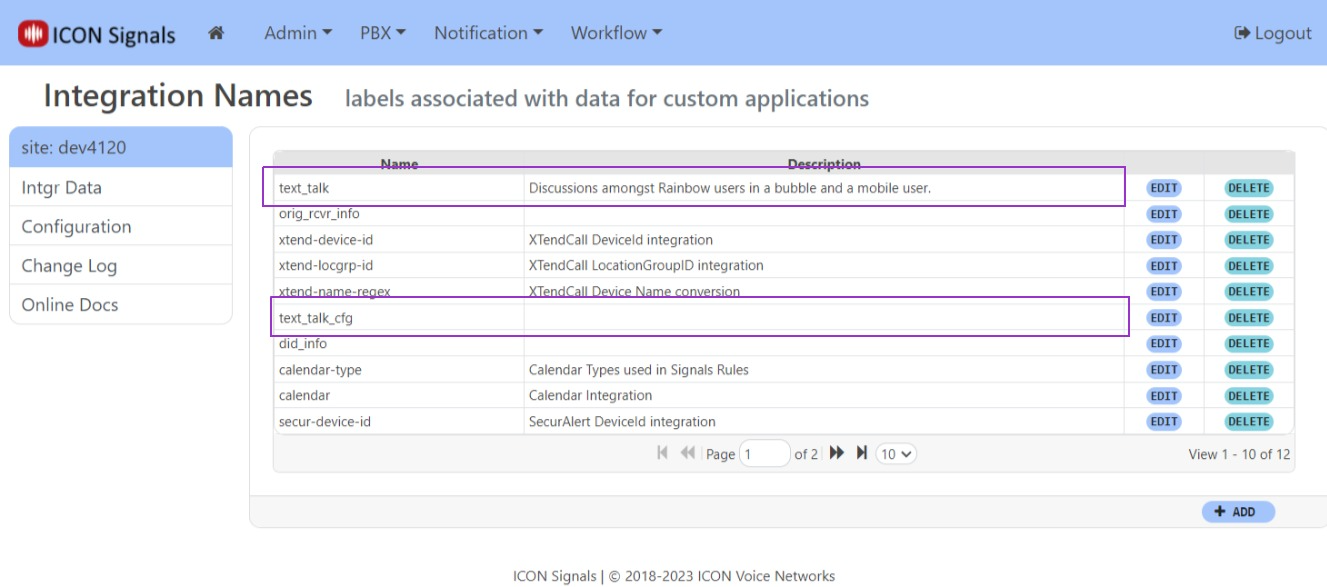
(3.2.1) To start TextTalk configuration, browse to Workflow > Integrations and click the Intgr Names link on the left.
Add an integration name text_talk (lower case characters with an underscore)
Add an integration name text_talk_cfg (lower case characters with underscores)
(3.2.2) Click the Intgr Data link to return to the Integration Table view.
(3.2.3) Enter text_talk in the search field to filter integration table rows.
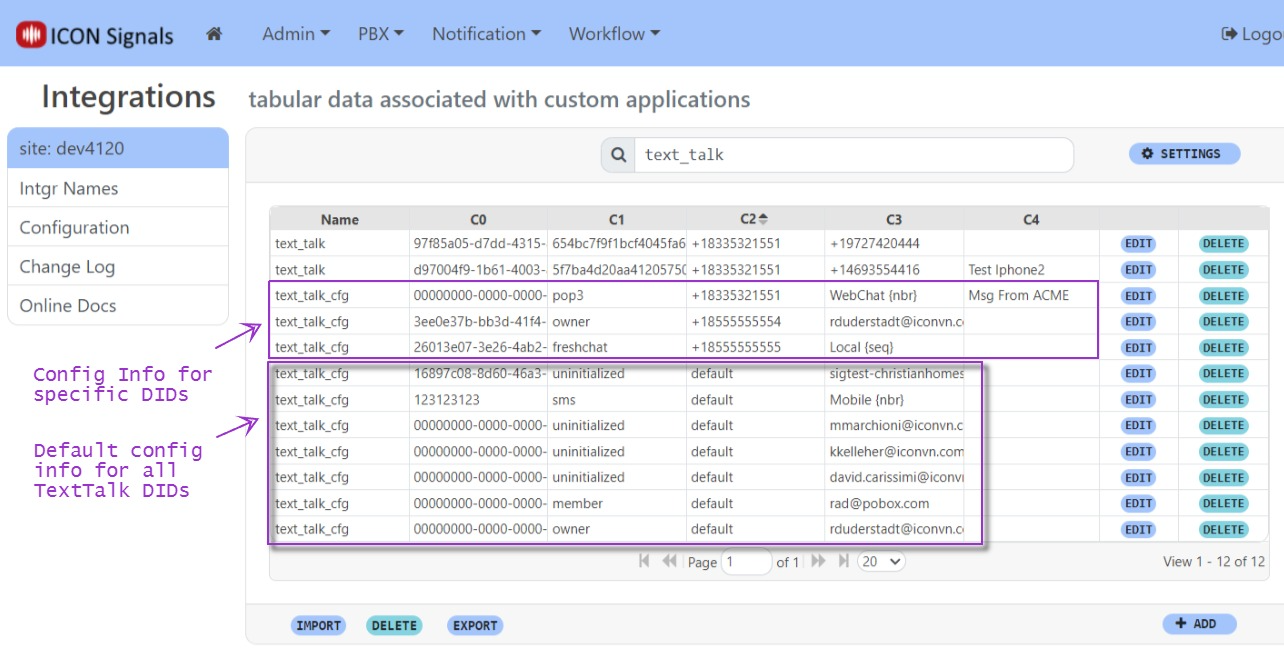
text_talk data rows are managed dynamically by Signals. They represent associations between Rainbow bubble IDs and cell numbers.
When a message from a new (i.e. unknown) cell number arrives, Signals creates a Rainbow bubble and then creates a text_talk data row to link the bubble ID to the cell number.
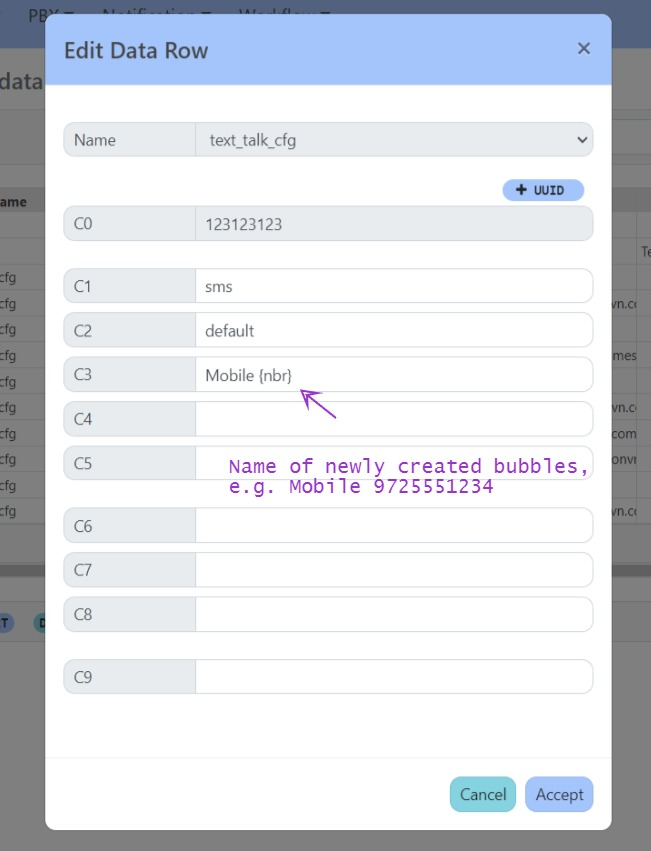
text_talk_cfg data rows are added and updated using the UI. This is configuration data with columns shown below.
| column | description |
|---|---|
C0 |
uuid - not used, but must be a unique field value |
C1 |
type of config data (owner, organizer, pop3, etc.) |
C2 |
DID or default |
C3 |
type-dependant value |
There are two types of text_talk_cfg data:
Configuration data can be specific to a single SMS DID (Twilio, Bandwidth, etc) or default values can be used for all text message DIDs that don't have DID-specific information. Specific and default owner/member data is not mixed: it's either one or the other. If there is one row of owner/member data for a DID, then default owner/member data is not used for that DID.
Supported owner/member values are:
ownerorganizermemberThe owner of a Rainbow bubble is able to rename the bubble, invite or remove other members, and delete the bubble.
A bubble organizer is able to invite additional members to a bubble.
Other values such as uninitialized are place holders and do not affect TextTalk operations.
Any Rainbow bubble owner, organizer or member is able to reply to messages sent by the cell phone user.
TextTalk is designed to proxy SMS messages between Rainbow bubbles and mobile user. However, it can also proxy non-SMS messages with other types of clients.
This is done by using fictional DIDs for both the Rainbow intake bubble and non-SMS clients and using integration data to mimic standard SMS proxy behavior. Fictional DIDs have an exchange of 555 (e.g. 8175550123).
(4.0.1) Non-SMS Client Identification
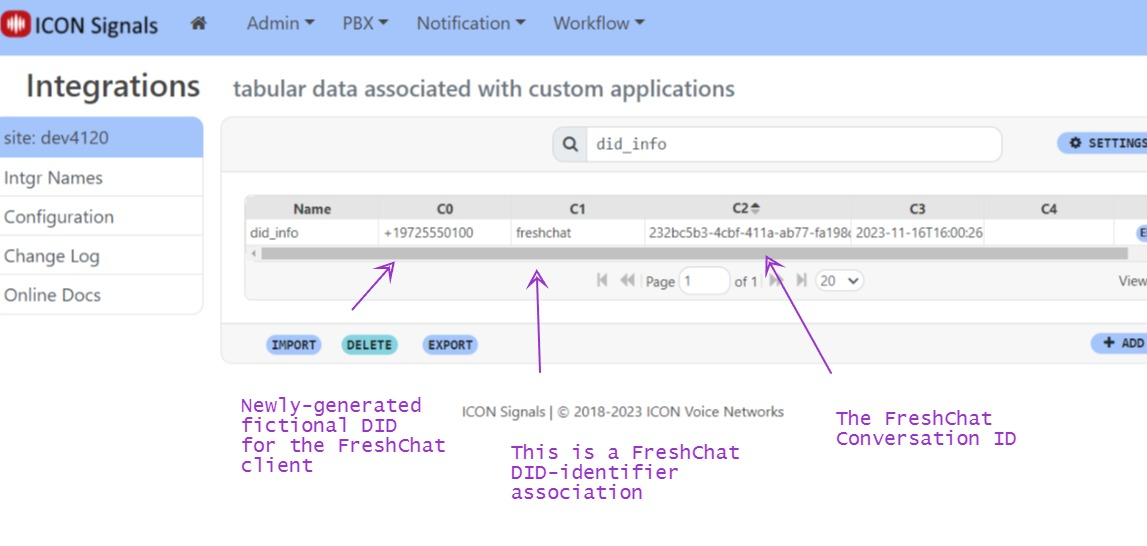
A non-SMS client probably doesn't have a phone number, but it will have some other identifier such as an email address. For FreshChat, that identifier is a Conversation ID.
(4.0.2) did_info Integration Data
Signals associates the non-SMS client identifier with a newly-generated fictional DID. In the example below, Signals has created a did_info data row linking a FreshChat conversation id to the fictional DID 9725550100.
(4.0.3) SMS Mimicry
The data flow works like this:
An incoming non-SMS message identifier is looked up in did_info to find the associated fictional DID for the client. If not found, a did_info data row is created using a newly generated fictional DID.
Signals treats the fictional DID as if it were an SMS text sent from a mobile user.
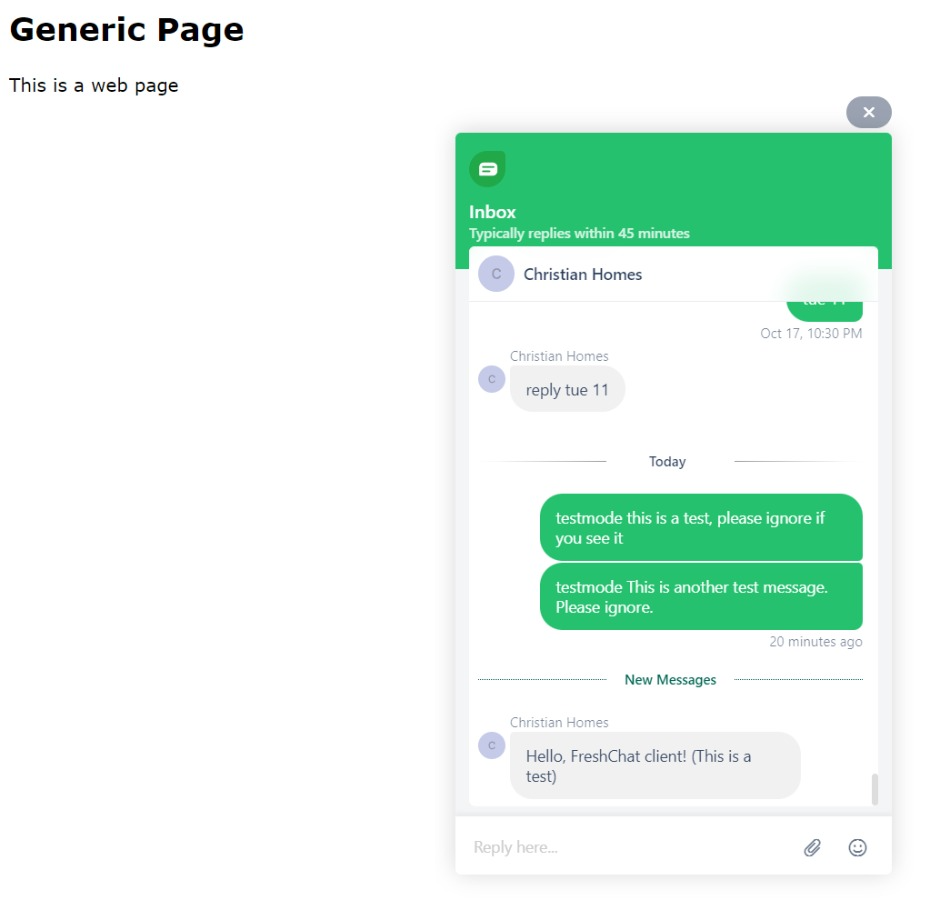
Replies to the Rainbow bubble are "sent" to the client's fictional DID which is translated back to the original non-SMS message identifier.
The outgoing message is sent using a non-SMS API to the client.
(4.0.4) Example
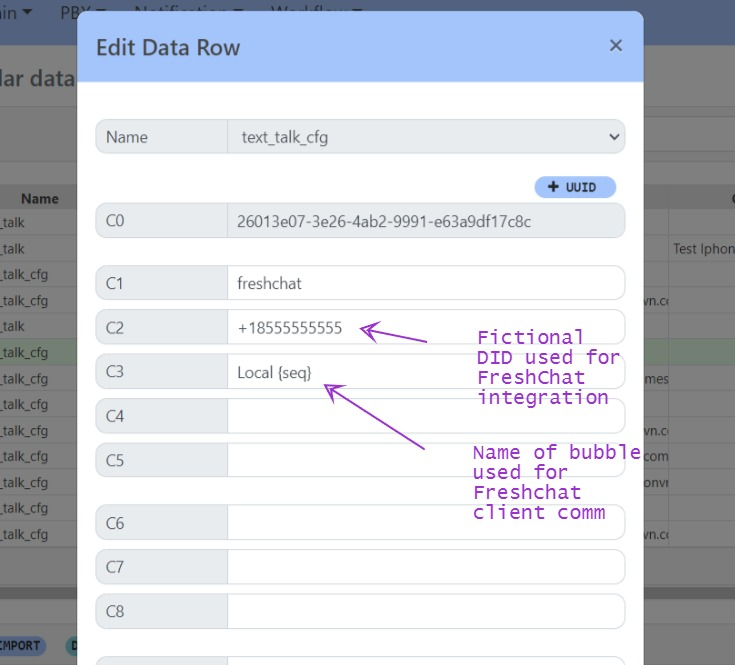
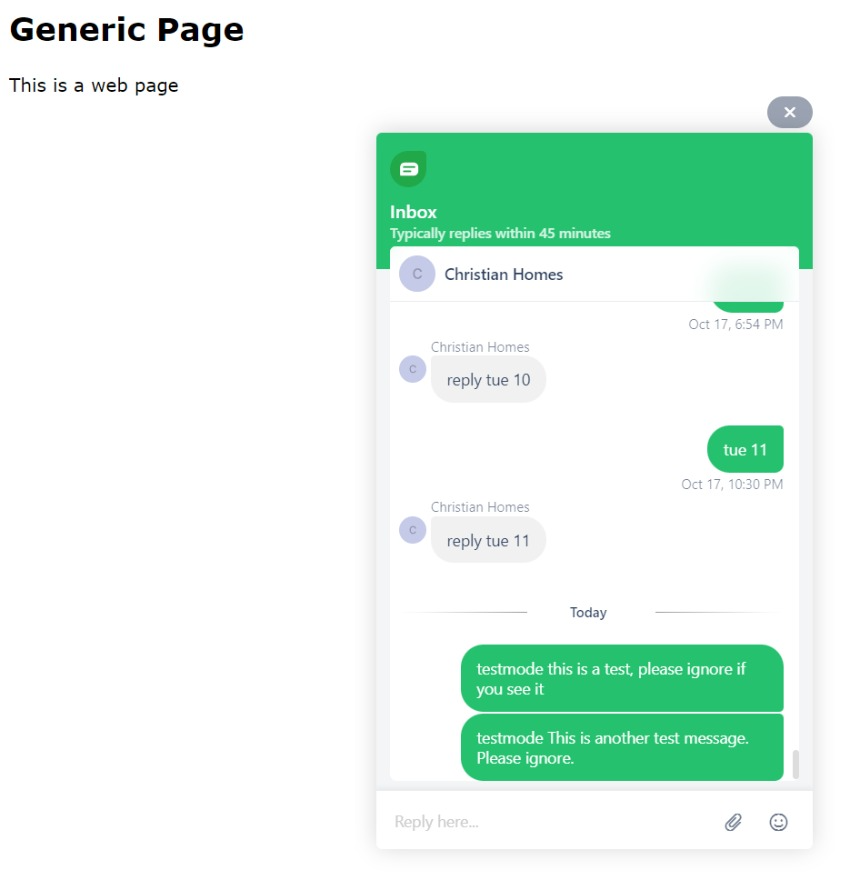
In this example, we use 8555555555 as the FreshChat DID and make the necessary Rainbow Bubble and Integration Table configuration changes.
A FreshChat web widget client sends an initial message.
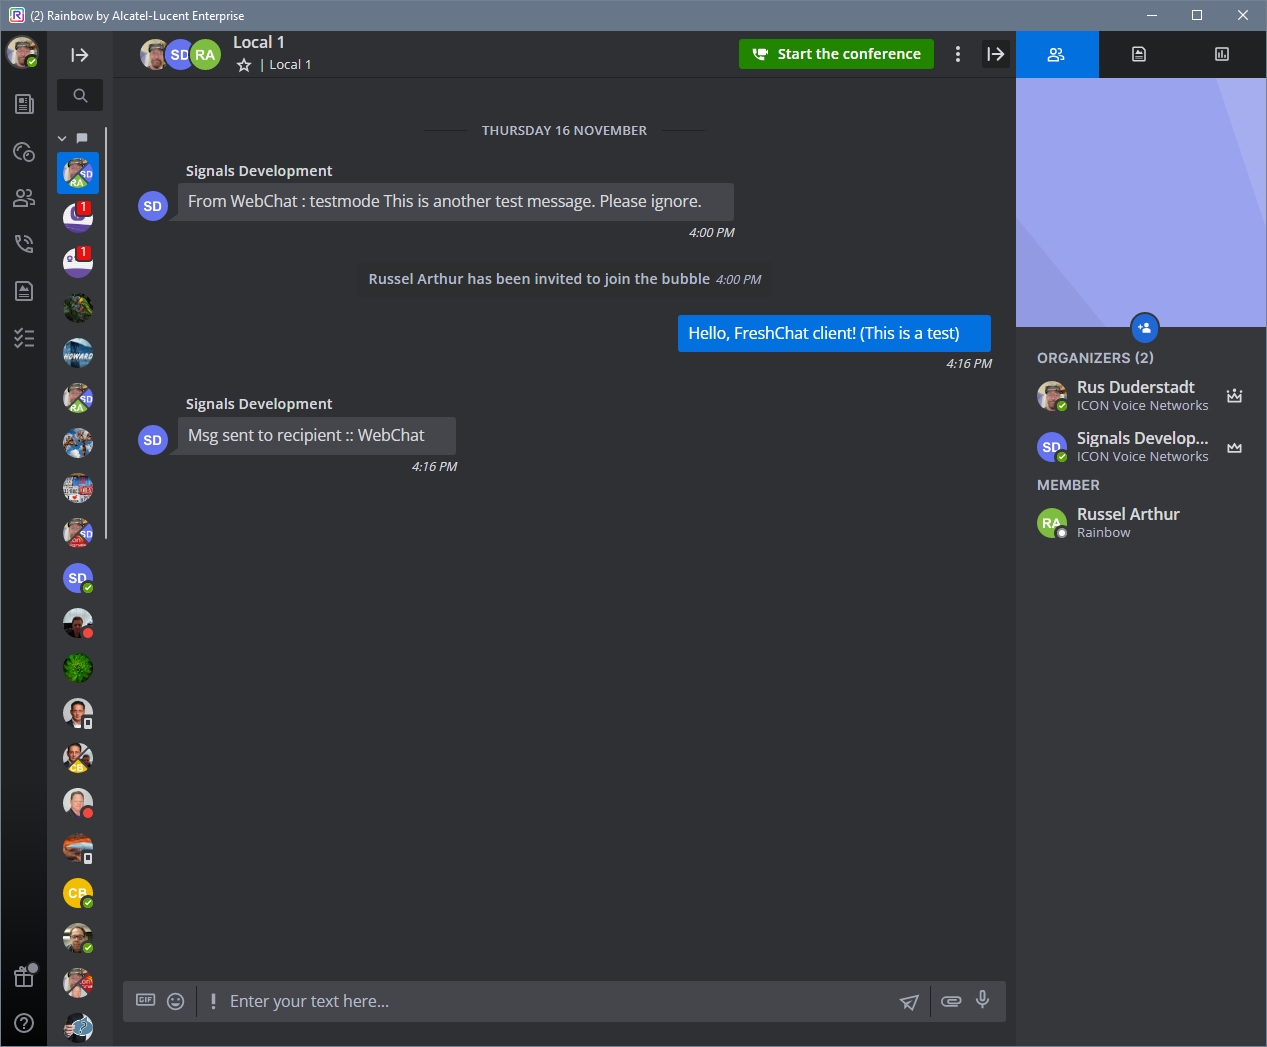
This results in a new Rainbow bubble. A Rainbow user can then reply to the initial message.
(4.0.5) Other Clients
Initial tests were done using email, receiving via pop3 and sending via smtp.
Instead of a conversation id, the client identifier was the user's email address. Otherwise, the mechanism was exactly the same.
The sending email address was looked up in the did_info data to find the client's fictional DID. If none was found, then a new fictional DID was created and added to did_info.
As already mentioned, the Integration Table UI is extremely generic. It is intended for one-off integrations with minimal work done by the customer.
A purpose-built TextTalk UI will be needed if customers are to modify the system.
Initial work on a separate "application" screen for Text Talk is shown below.
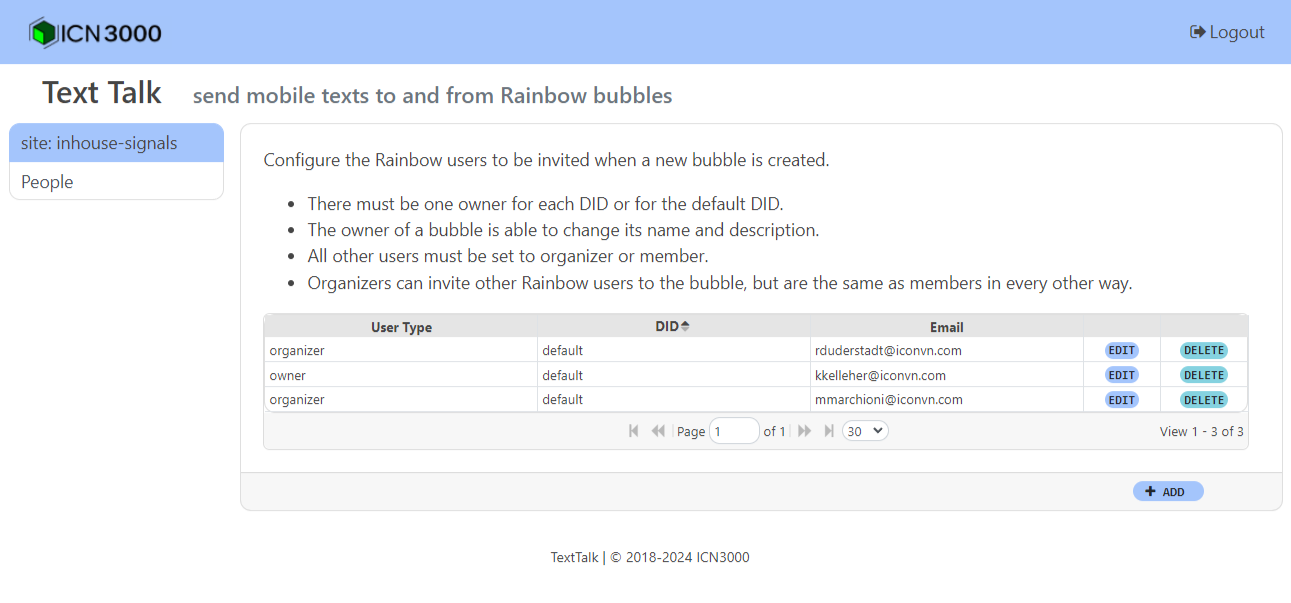
A more general description of the ICON Application screens idea will be forthcoming in a separate document.
Currently, this section documents a FreshChat account with one agent and one topic named "Inbox". If we implement a multiple-agent or multiple-channel site in the future, these details will be updated.
Note: The admin interface is full of other FreshWorks service content. Avoid or skip "quick start" and "self-service journey" dialogs and links when you encounter them. Your focus is on the FreshChat account.
(FC.01) Login to FreshChat admin client
(FC.02) Go to Admin Settings (Gear icon)
Channels should be the default section, but select it if that is not the case.
(FC.03) Under Channels select Web Chat
Bot Mapping set only one topic to be active(FC.04) Go back to Admin Settings and select Marketplace and Integrations
(FC.05) Select API Settings
Data found here must be copied into the Signals UI.
(FC.06) Log in to the Signals UI using the admin account
(FC.07) Select Admin > Configuration and click Text Mgmt in the SMS / Email group
(FC.08) Add a FreshChat Text Provider
Type dropdown, select FreshChatHandlers field, enter log, texttalkAdvanced field, enter the following:actorID: foo
authToken: bar
The Advanced field is a combination of 'key: value' pairs. We will replace the bogus values 'foo' and 'bar' with correct values from an API call and from the FreshChat UI.
We're not finished yet, but save your work.
Accept button(FC.09) Copy values from FreshChat UI into Signals UI
Both of the values below are found in the API DETAILS FOR CHAT section of the FreshChat page.
Copy the Your chat URL value into the App ID field in the Signals UI
Copy the Your API Key value into the Advanced field in the Signals UI, replacing the bogus value entered in the previous step.
The API key is very long (more than 1000 characters).
The Advanced field should now look similar to this:
actorID: foo

authToken: eyJraWQiOiJjdXN0b20tb2F1dGgta2V5aW...
At this time, we need to enable the provider.
Check the Enable Provider checkbox
Click the Accept button.
The freshchat provider should be enabled in the provider grid.
(FC.10) Complete the Advanced field configuration
The last piece of information needed is the FreshChat ID associated with the agent account. Unfortunately, this information is not available within the FreshChat UI, so we must make an API call to obtain it ourselves.
The general form of the URL is:
http://{server address}:6502/api/text/freshchat/test?testno=4
or
https://{server address}/sr/api/text/freshchat/test?testno=4
Examples:
http://localhost:6502/api/text/freshchat/test?testno=4
http://10.182.1.14:6502/api/text/freshchat/test?testno=4
The result should be JSON data similar to this:
{
  "Code": 200,
  "Desc": "OK",
  "Data": "{\"agents\":[{\"round_robin_access\":false,\"freshchat_access\":true,\"groups\":[],\"role_id\":\"OWNER\",\"role_name\":\"Owner\",\"is_deactivated\":false,\"is_deleted\":false,\"locale\":\"en-us\",\"timezone\":\"Pacific Time (US \\u0026 Canada)\",\"availability_status\":\"UNAVAILABLE\",\"agent_status\":{\"name\":\"Inactive on Intelli Assign\"},\"routing_type\":\"INTELLIASSIGN\",\"agent_capacity\":8,\"created_time\":\"2024-01-26T16:07:36.766Z\",\"id\":\"2892b8f4-918e-4cb9-a7c9-528da2624164\",\"first_name\":\"Michael\",\"last_name\":\"Smith\",\"email\":\"marketing@acme.com\",\"avatar\":{},\"social_profiles\":[],\"login_status\":false}],\"pagination\":{\"total_items\":1,\"total_pages\":1,\"current_page\":1,\"items_per_page\":10},\"links\":{\"first_page\":{\"href\":\"/v2/agents?sort_by\\u003demail\\u0026items_per_page\\u003d10\\u0026sort_order\\u003dasc\\u0026page\\u003d1\",\"rel\":\"agent\",\"type\":\"GET\"},\"last_page\":{\"href\":\"/v2/agents?sort_by\\u003demail\\u0026items_per_page\\u003d10\\u0026sort_order\\u003dasc\\u0026page\\u003d1\",\"rel\":\"agent\",\"type\":\"GET\"}}}"
}
The field we are interested in is the 'id' field, which is in a UUID format.
2892b8f4-918e-4cb9-a7c9-528da2624164
actorID.The Advanced field should now look similar to this:
actorID: 2892b8f4-918e-4cb9-a7c9-528da2624164

authToken: eyJraWQiOiJjdXN0b20tb2F1dGgta2V5aW...
Accept button.(FC.11) In the FreshChat UI, go back to Admin Settings and select Marketplace and Integrations again.
This time select Conversation Webhooks
Set the Webhook to a Signals server accessible on the internet or an Overwatch node that can proxy webhook requests.
Examples:
https://watcher.icondatanetworks.com/sr/api/text/freshchat/recv?node=acme
https://acme.com/sr/api/text/freshchat/recv
The remaining steps in this section involve the Signals UI.
(FC.12) Create an "intake" Rainbow bubble for TextTalk
PBX > Alcatel Rainbow, Rainbow BubblesREFRESH if the newly-created bubble doesn't appear in the list(FC.13) Edit the TextTalk intake bubble
TextTalkaccept:1, auto:1+18555555555(FC.14) Select Workflow > Integrations
Click on the left navigation link: Intgr Names. Add the following integration names if they do not already exist. All names are case-sensitive.
did_infotext_talktext_talk_cfg(FC.15) Select Workflow > Integrations
You can also click Intgr Data in the Integration Names page.
At a minimum we must create two text_talk_cfg Integration Data rows. In both cases, click the +UUID button to generate a unique value for column C0.
Add text_talk_cfg row:
| C1 | C2 | C3 |
|---|---|---|
freshchat |
+18555555555 |
WebChat {seq} |
Newly-created Rainbow bubbles will be named 'WebChat 1', 'WebChat 2', etc.
Add an owner text_talk_cfg row:
| C1 | C2 | C3 |
|---|---|---|
owner |
+18555555555 |
owner email address |
Additional moderator and member rows can be added.
(FC.16) Test the Integration
Important: the web page must be on a publicly available web server!
The FreshChat web widget will NOT work on an internal test server or development server unless a very large number of IP addresses are white-listed in the firewall for incoming connections.
2018-2024 ICON Voice Networks