| date | desc |
|---|---|
| 19 Dec 2019 | initial |
ControlByWeb has two Wireless Temperature Sensors, the XW-110 and the XW-110 Plus.
The two devices share some common features, but the product names are misleading because the operational differences are significant.
Both devices have:
The XW-110 is similar to the XW-111 Digital Input Sensor in that it supports Stand-alone mode and Slave mode.
The XW-110 Plus does NOT support Slave mode. For this model, the batteries only serve as a backup power source during a short-duration power outage.
The XW-110 Plus supports up to three temperature probes attached in a daisy chain topology to small gauge 3-conductor wire (Cat 5e, 18-3 thermostat wire, etc.)
NOTE: The word "WebRelay" is used as a brand designator in this document, even for devices that have no relay outputs.
The XW-110 supports Stand-alone mode and Slave mode. Stand-alone mode is intended for use with a 5 VDC external wall transformer and provides all of the features we are accustomed to with the PoE WebRelay devices:
Slave mode is intended for use with 2 AA batteries. In this mode, the device periodically sends a data packet to an external WebRelay device or other system (e.g. ICON Signals).
The previously mentioned services are not available in this operating mode.
A key difference between the operating modes is that temperature status is only sent to the remote host (Signals) at a regularly-scheduled interval, regardless of the alarm settings.
This bears repeating: In Slave Mode the device will only send temperature data at the regular interval.
In standalone mode, the device will send temperature data whenever the value goes outside of the configured limits.
| power | desc |
|---|---|
| Extern-5-VDC | Works at higher temperature range compared to battery options |
| 5-VDC + 2xAA | Batteries only used when external power is lost |
| 2xAA | Only used for slave mode (send periodic data packet to another system) |
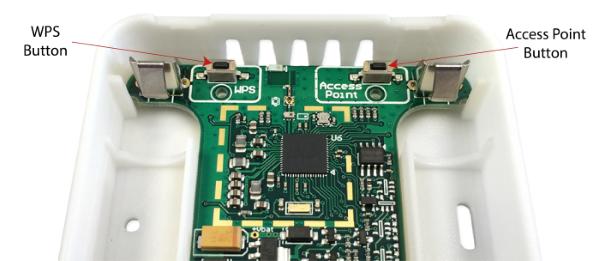
Two buttons are available to configure the device:
The buttons are reached by removing the top cover of the WX-111. I have found that the non-driver end of the ControlByWeb screwdriver is a good implement for pressing these buttons.
WX111-{last 6 digits of device MAC addr}192.168.1.2/setup.htmladmin password: webrelayNote: You can use Access Point mode when running on battery power, but it uses a lot of energy and will drain the batteries very quickly. So, enter Access Point mode, get your configuration work done, and leave Access Point mode (by rebooting) as soon as possible.
Using this method assumes the the customer site router has a WPS button and that it is accessible. If true, then these steps should put the WX-111 on the network. However, you will still have to determine the WX-111 IP address in order to configure it.
WPS Mode is probably only useful if the WX-111 is correctly configured except for the SSID and password of the customer site network. In other words, it no configuration is needed.
To date, all development and testing of this device has been done using Access Point mode.
For ICON Signals integration, we support the following operating configurations:
TBD
 FC     MAC         SALT   INTERVAL  BAT   INP
0002 000CC804867D 00000000 000000F0  61    0C

61 == 97% battery life

F0 == 240  (4 minute interval)

0002 000CC804867D 00000000 000000F0  61    0D     inp1 closed
0002 000CC804867D 00000000 000000F0  61    0E     inp1 closed


0002 000CC804867D 00000000 000000F0  61    11111111 22222222 33333333  21, 25, 29
2018-2022 ICON Voice Networks